Subway Art Tutorial
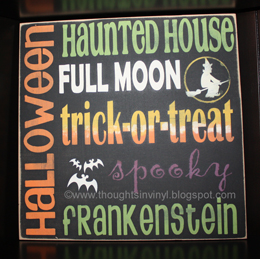
This is the first subway art I ever made, and I absolutely fell in love with how it turned out!
Here is what I did for my subway art
1. Paint your 12×12 board a solid color. Sand your board lightly with sand paper, and apply a second coat of paint.
(I painted mine chocolate brown.)
2. Apply your vinyl stencil
(you can purchase them here and you can pick the two layouts you want!)
3. Paint each word a differnt color.
I think you could use a different color on each word, but I generally use 3-4 colors and just make sure I don’t have two painted the same color right next to each other.
I dry brush my paint on. To do this, you get paint on your brush, but then wipe most of it off on a paper towel, then you just build up a thin layer of paint over and over until the word is completely painted over. This works best so your paint doesn’t bleed underneath the vinyl stencil, and it speeds up the time you have to wait for the paint to dry. I tipically dry brush the paint over each word 2-3 times until I can’t see the underneath color any more.
4. Once the paint has dried to the touch, remove the vinyl stencil.
(make sure that if you have wet paint on your stencil that it doesn’t touch the board as you peel it off…I learned this the hard way…)
5. Using a tooth pick or tweezers, remove the rest of the stencil that is left behind…such as the middle of the “o” the center of the “a”, and other letters or shapes that have a small peice that isn’t attached to the main part of the stencil.
6. Lightly sand the entire board. This is my favorite part! This softens all the paint colors and “knocks” down the paint edges and makes the entire surface smooth. I sand the edges really well too so the natural wood shows through.
7. Sit back and marvel at the “hand painted” subway art you just made!

